Getting started
This page takes you from signing up to your first pass. You will create your organization, add a spacecraft and a ground station, connect the AutoSat agent, then follow the pass in the console.
Sign up
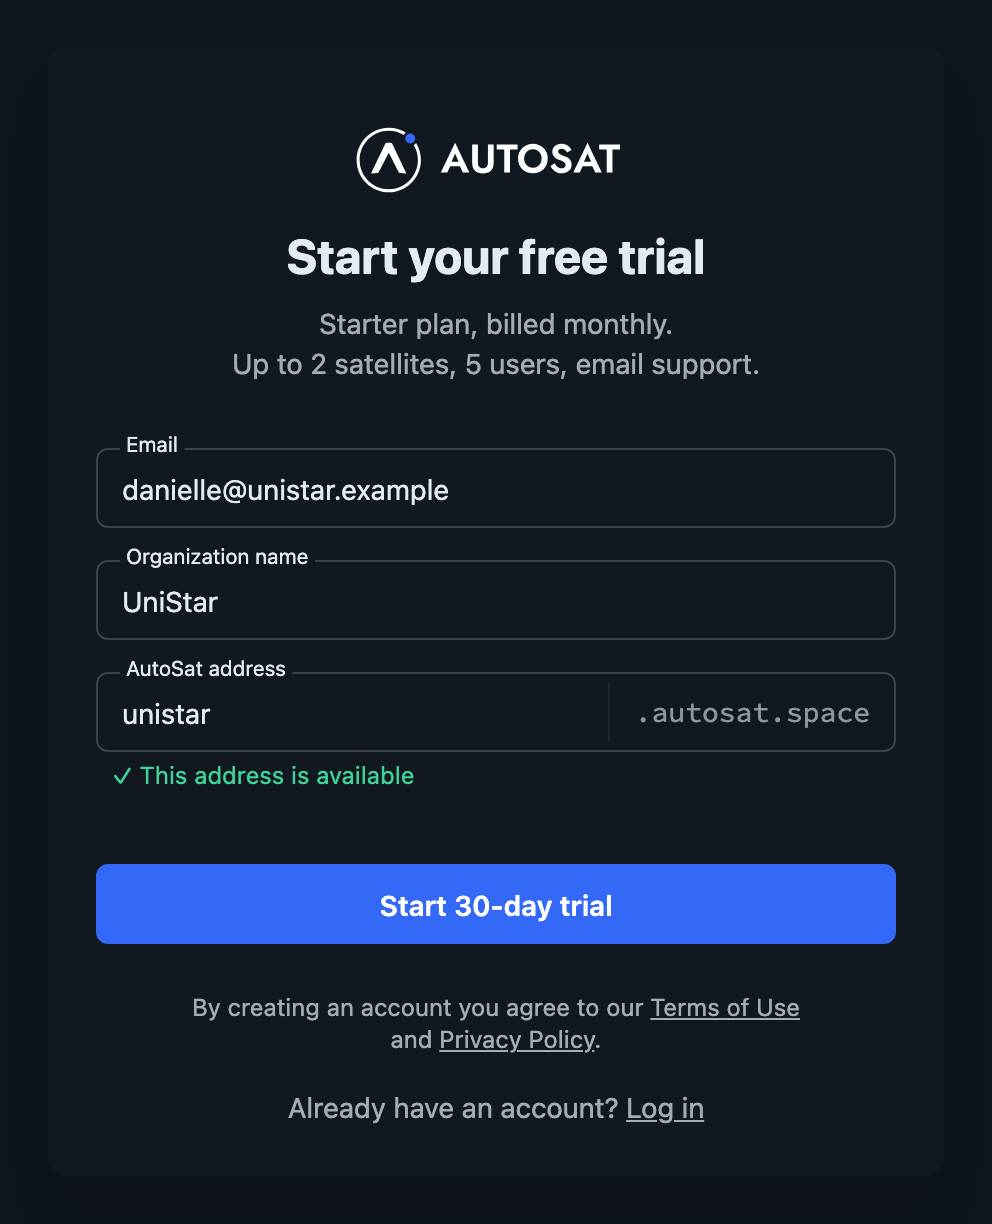
-
On autosat.space, click Free trial. The signup form opens.
-
Enter your Email and Organization name.
-
Check the AutoSat address. This will be the URL for your organization’s AutoSat console, such as
orgname.autosat.space. We generate a default from your organization name, but you can change it if you like. -
Click Start 30-day trial, then enter your payment details. You won’t be charged until the trial ends, and you can cancel at any time.
-
Wait while AutoSat sets up your organization. This usually takes a few seconds.
-
Log in with your Microsoft or Google account. The account you log in with becomes the owner of the organization.
AutoSat also emails a setup link to the address you entered. If someone else will run your spacecraft, they can use that link to take ownership instead of you. The link expires after 7 days.
AutoSat creates your first workspace and names it after your organization. After logging in, click the workspace card in the Workspaces list.
To look around before you add your own spacecraft, click Add demo data on the console’s welcome screen. It adds eight spacecraft, two ground stations, some commands and a workflow. The demo spacecraft are test articles, so they don’t count toward your plan.
Add your spacecraft
AutoSat works out your passes from your spacecraft’s orbit. It gets the orbit as a TLE from Space-Track, using the spacecraft’s Satcat ID (its NORAD catalog number).
- Click Spacecraft in the sidebar, then click New spacecraft.
- Enter a Spacecraft name.
- Enter the Satcat ID.
- If you’re adding an engineering model, flatsat or simulator, select Test article. Test articles don’t count toward your plan.
- Fill in the fields for the way you’ll reach the spacecraft:
- IP address: where the agent sends UDP messages. During each pass, AutoSat also pings this address to measure latency.
- Default port and Active protocol version: needed only if you send protobuf messages over UDP. See Protocols, commands & UDP.
- Click Create.
AutoSat checks Space-Track for new TLEs every 12 hours, so it can take up to 12 hours for a new spacecraft’s passes to appear. You can’t enter a TLE by hand.
Add a ground station
- Click Ground stations in the sidebar, then click Create ground station.
- Enter the Ground station name, Latitude, Longitude and Height (km).
- Optionally, set a Minimum elevation (degrees) and Minimum pass minutes. AutoSat ignores passes below that elevation or shorter than that time. If you leave the elevation blank, AutoSat uses 10°.
- If you’ll send protobuf messages over UDP, enter the UDP ports the agent should listen on for telemetry, separated by commas.
- Click Create.
AutoSat now works out passes for each spacecraft over this ground station, four days ahead.
If your spacecraft carries an ANT61 Beacon, you can reach it through the Beacon API instead. You don’t need to install an agent or wait for a pass. See ANT61 Beacon integration.
Install the agent
The AutoSat agent runs at your ground station. It connects to the AutoSat cloud service and relays commands and telemetry during each pass. It runs on Linux, macOS and Windows. To use AWS Ground Station, install the agent in your Ground Station EC2 image.
Download the agent
- Click Settings in the sidebar, then click Ground station authentication.
- Under Download agent package, choose the Target platform for the computer that will run the agent.
- Leave Include key pair and certificate turned on. The agent uses this certificate to connect to the cloud service over mutual TLS.
- Click Download agent package.
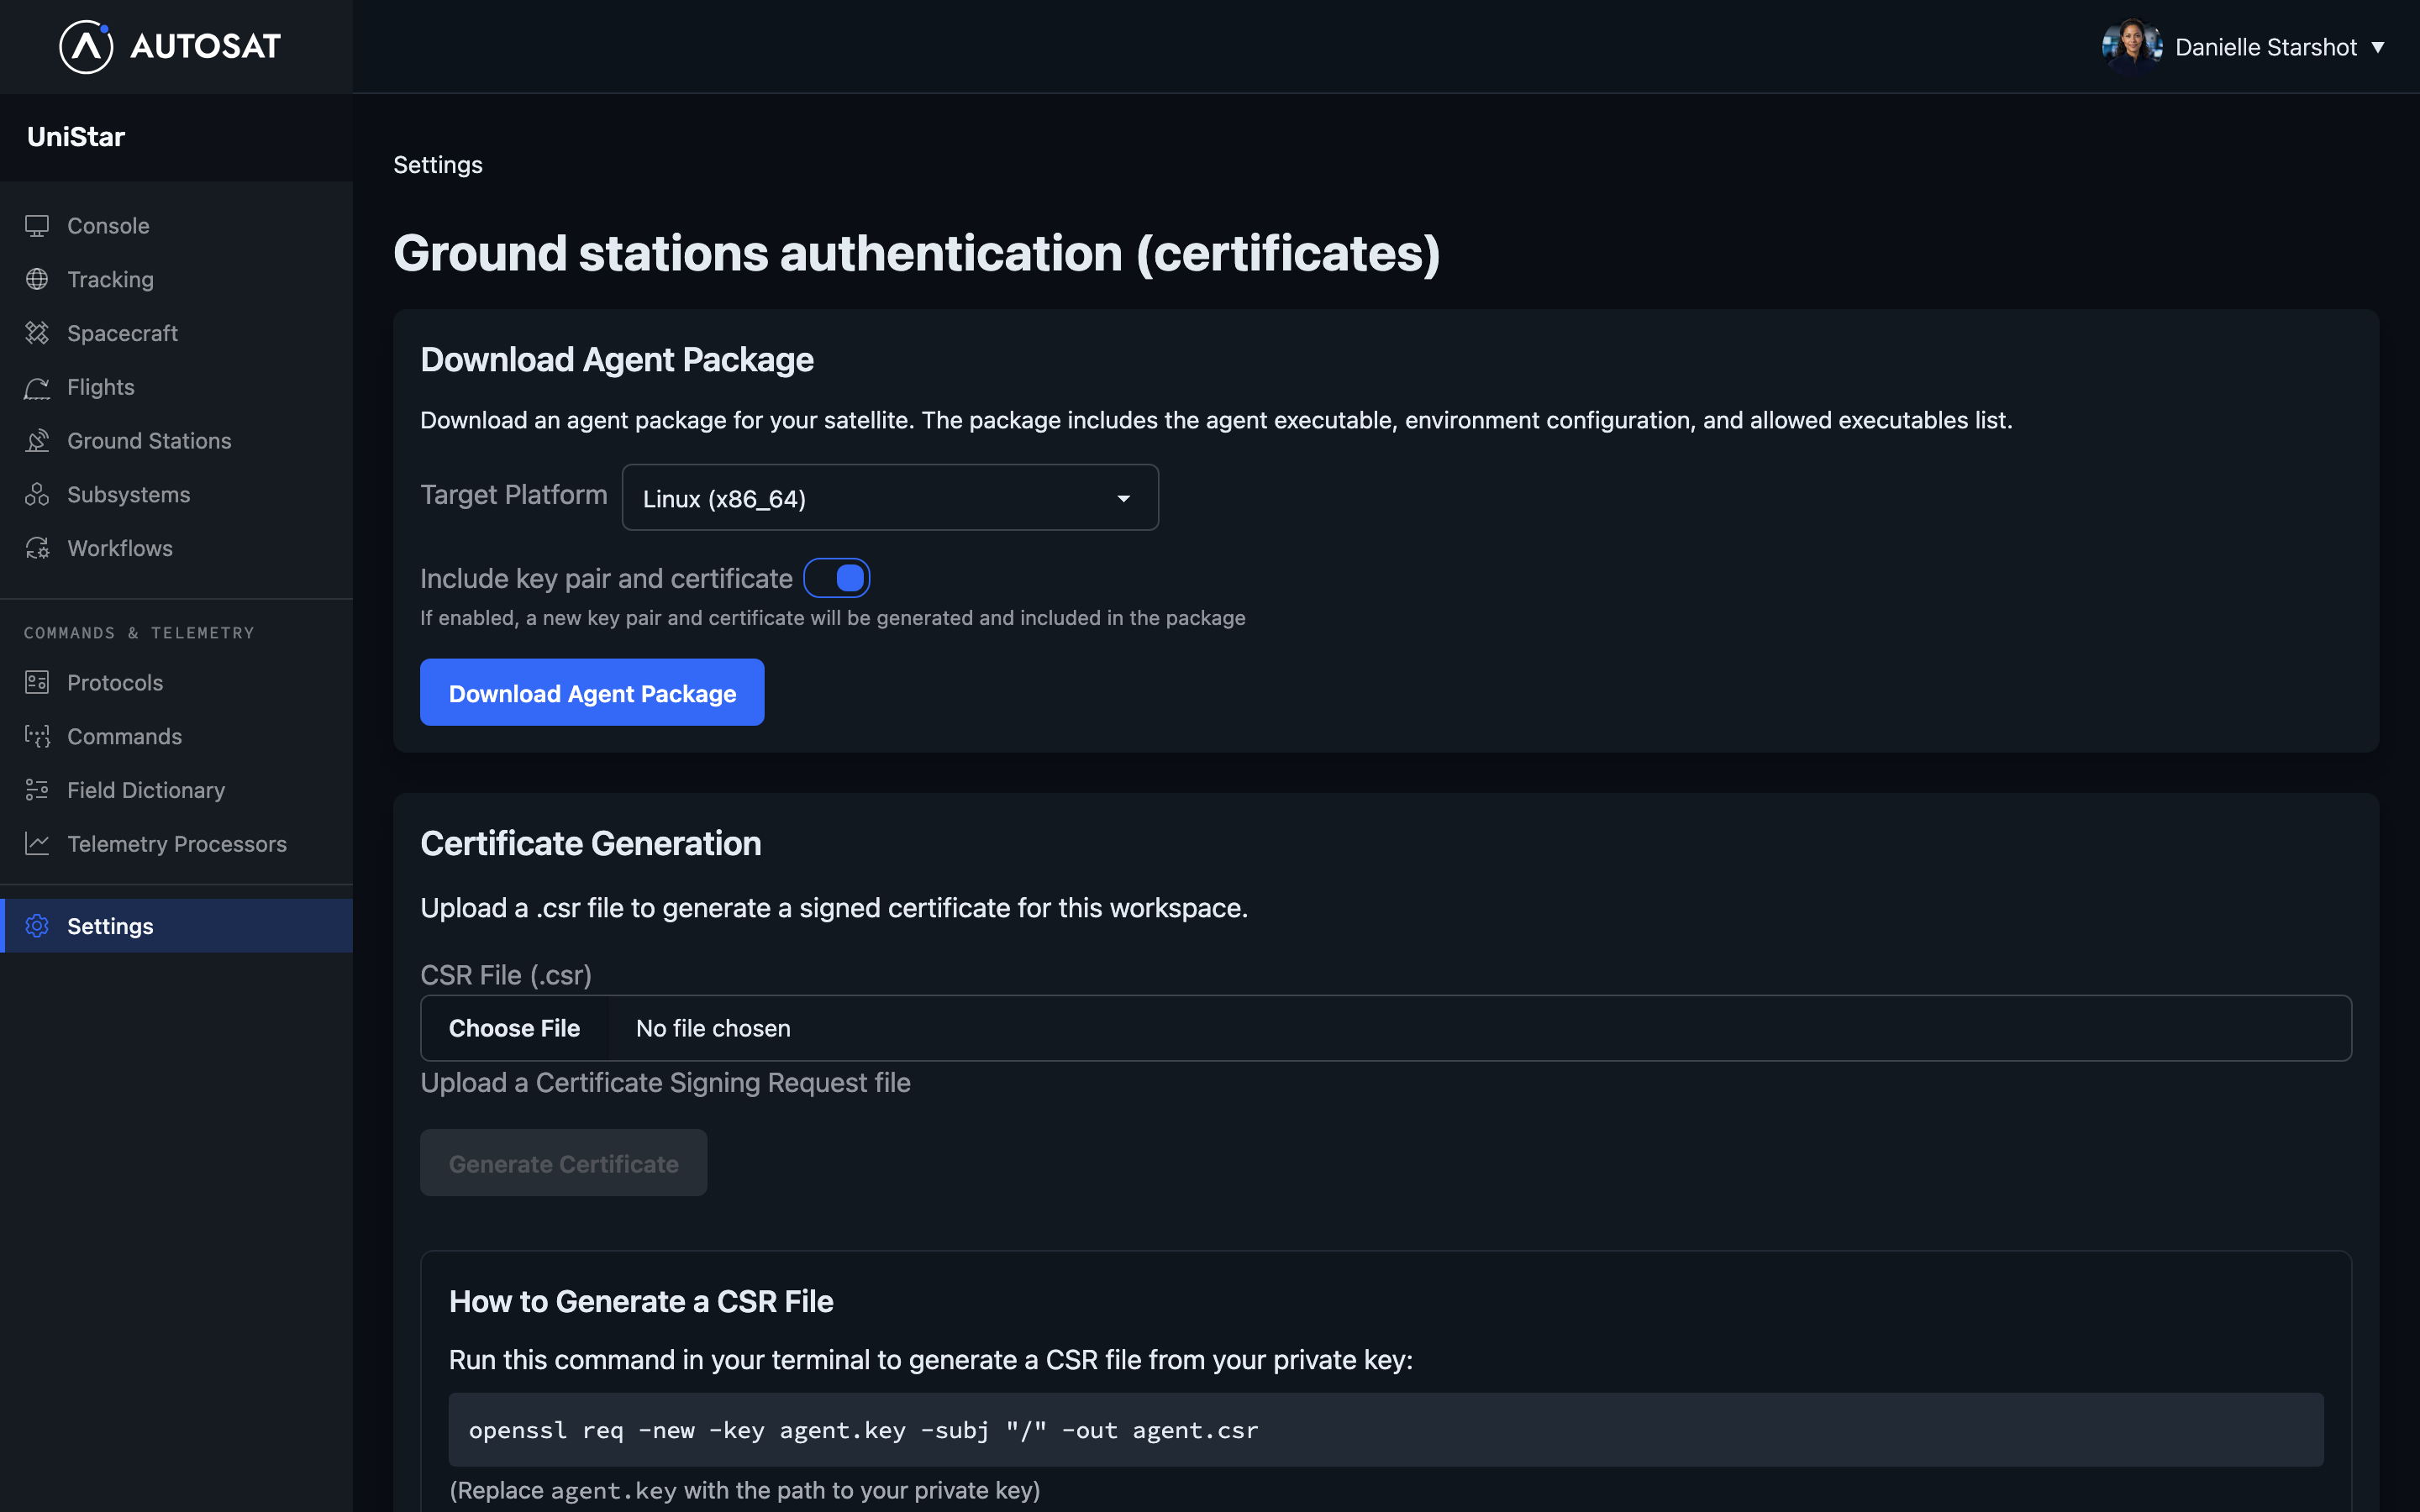
If your security policy doesn’t let you download a private key, turn off Include key pair and certificate. Then make a certificate signing request from your own key and upload it under Certificate generation.
Configure the agent
Unzip the package on the ground station computer and open the .env file.
- Find the
GROUND_STATION_UUIDlines. There is one for each ground station in your workspace, and only the first is turned on. Remove the#from the one you want and add a#to the others. To serve all your ground stations from one agent, useGROUND_STATION_UUID=all. - Change
DRY_RUN=truetoDRY_RUN=false. While dry run is on, the agent only prints the commands and UDP messages it would have sent.
The agent only runs programs listed in allowed-executables.txt. Each line is
a regular expression matched against the program name, such as ^ping.*. Add
a line for each program your commands run, then restart the agent. This file
doesn’t apply to protobuf messages over UDP.
Start the agent
The agent needs to reach the cloud service at mqtt.autosat.space on TCP port
15676. It only makes outgoing connections.
On Linux or macOS, run these commands in the unzipped folder:
chmod +x ./agent
xattr -d com.apple.quarantine *   # macOS only
./agent
On Windows, run agent.exe from the unzipped folder.
To keep the agent running on Linux, use the autosat-agent.service file in the
package. The package’s README.md shows how to install it with systemd.
Check the connection
- Click Console in the sidebar.
- Choose your spacecraft and ground station from the menus at the top.
A green dot next to the ground station name means the agent is connected. A red dot means it isn’t. The console also prints a message when the agent connects or disconnects.
Add a command
Add at least one command so that you have something to send during the pass.
- Click Commands in the sidebar, then click New command.
- Enter a Name, using underscores instead of spaces.
- Under Type, choose how the command reaches your spacecraft:
- Execution runs a program or script on the agent’s computer. Enter the
Executable and its Args, one per line. Add the program to
allowed-executables.txt. - Protobuf sends a protobuf message over UDP. See Protocols, commands & UDP.
- Execution runs a program or script on the agent’s computer. Enter the
Executable and its Args, one per line. Add the program to
- Click Create command.
Find your next pass
Click Tracking in the sidebar. The Next pass card shows the ground station, start time, duration and maximum elevation of the next pass. To see all upcoming passes for a ground station, click it in the Ground stations list.
The panel on the right of the console also counts down to the next pass for the spacecraft and ground station you’ve chosen.
Run your first pass
- Before the pass, open the Console and choose your spacecraft and ground station.
- Check that the ground station has a green dot.
- When the pass starts, the panel on the right changes from No contact to Pass expected — no signal. It changes to Receiving once telemetry arrives.
- Type
helpto list your commands, then type a command and press Enter.
The console shows each command and its response, and AutoSat logs them for later. Commands aren’t queued: if the agent isn’t connected, AutoSat doesn’t send the command, and you need to run it again once the agent is back.
Next steps
- Protocols, commands & UDP: define your message formats and send protobuf commands.
- Telemetry: choose the values to track and chart them.
- Tracking: follow your fleet and plan passes.